|
|
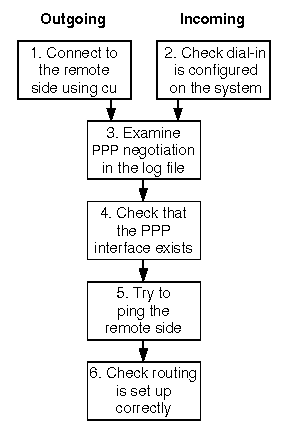
Steps in troubleshooting PPP links
The steps are detailed in the following sections:
For advice on how you should configure PPP on Microsoft Windows systems so that they can interoperate with a UnixWare® 7 remote access server, see ``Interoperating with PPP in Microsoft Windows''.
For advice on interoperating with 3Com NetBuilder, see ``Interoperating with 3Com NetBuilder''.
If the remote system requires that you log in using a chat script to start a PPP session, restart the connection server with debugging turned on, and use the cu(1bnu) command to connect to the remote system:
This will generate information in the /var/adm/log/cs.debug file about the line settings and how a call is set up.
remotesys is the entry for
the remote system in the
Systems(4bnu)
file.
This command will allow you to check the chat script defined in the
entry for the remote system in the
Systems(4bnu)
file by dialing and logging into the remote system. In this case, you must
enter the name and password yourself because cu does not invoke
the chat script by default.
If you want cu to invoke the chat script to see how well it
works, specify the -x option:
cu -x remotesys
You can obtain more debugging information by specifying the -d option to cu.
Enter ~. to drop the connection.
Common problems are:
Use the WAN view of the Network Configuration Manager to check that your system is configured to accept incoming connections and logins on the desired serial port or ISDN device. For more information about configuring modem ports to accept incoming calls, see ``Configuring a serial port''.
For incoming connections over a modem, try dialing the number and see if the modem answers the call. If the modem does not answer incoming calls, use the following steps to try and solve the problem:
Direct term/01m - 9600 direct
Each instance of a serial port monitor is identified by a tag with the format ttymonN in the ``PMTAG'' field.
The name of the serial port is listed in the ``PMSPECIFIC'' field.
If a ttymon process is monitoring the modem port,
stop and restart it:
sacadm -k -p ttymonN
sacadm -s -p ttymonN
See ``Adding and configuring modems'' for more information about debugging dial-in problems with modems and the serial port monitor.
The procedure for checking whether an ISDN monitor is running to monitor incoming calls on ISDN lines is very similar to that for serial lines. The device node for each B channel of an ISDN adapter is named /dev/isn, and the port monitor is isdnmon. You can configure an ISDN adapter to receive incoming calls using the WAN view of the Network Configuration Manager. For more information about troubleshooting ISDN connections, see ``Troubleshooting ISDN connections''.
If you still cannot establish an incoming or outgoing PPP connection, you must use the debugging facilities of ppptalk(1M) to diagnose where the problem lies. ``Stages in negotiating a PPP connection'' shows that once a physical connection has been established between the systems at each end of the link, PPP negotiation can be divided into a number of stages. If the negotiation fails in any of these stages, the link may be dropped and the connection terminated. By turning on debug logging, you can watch these stages and see where any problems are arising.
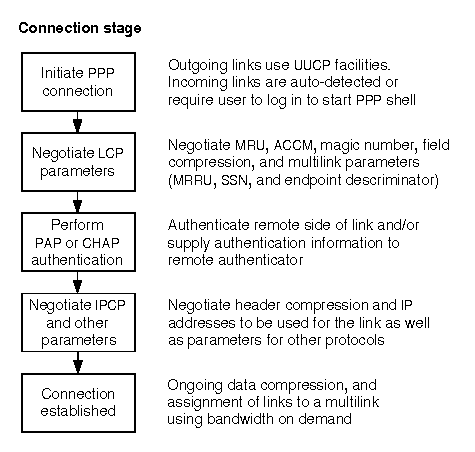
Stages in negotiating a PPP connection
Debug information is written to the file /var/adm/log/ppp.log.
To change the level of detail for a particular bundle or physical link, you
can use the debug facility that is available with the
ppptalk command.
For example, to set a medium debug level on the bundle test,
and a high debug level on the link link_0, you would enter the
following commands:
ppptalk debug med bundle test
ppptalk debug high link link_0
The low debug level generates a small amount of output including negotiated
values. The medium level generates more detailed output and is usually
sufficient for most debugging purposes. The high debug level
is usually only necessary if you want to see all packets and their
contents. This can rapidly generate a large quantity of data in the log
file. For more information about the debug levels, see
ppptalk(1M).
If you do not know the names of the links which
a bundle references, use the following
command to list the links statement
within a bundle definition:
ppptalk list bundle name | grep "links"
Look for a line in the output such as:
links = link_0 link_1 link_2 link_3The example of debug output in the following sections is for a manually connected outgoing PPP link over a modem. The debug level was set to medium for both the bundle (Annex) and the link (link_0). The time and date information at the start of each line has been replaced with a line number for clarity.
In this example, the command ppptalk attach Annex was used to initiate an outgoing PPP connection to the remote system Annex over the modem port /dev/term/00m.
1   Link link_0 : Dialing remote system 'Annex', telno '', dev '/dev/term/00m'
2   Link link_0 : Hardware flow control selected
3   Link link_0 : Links index 27
4   Link link_0 : Phase was DEAD, Phase Now ESTABLISH
5   Bundle Annex: Adding link link_0 to the bundle
If the connection was incoming, you would see messages such as the following:
1   Incoming call: dev '/dev/term/00m', uid 'foo', speed '19200'
2   Link link_0 : Incoming call
3   Link link_0 : Hardware flow control selected
4   Link link_0 : Phase was DEAD, Phase Now ESTABLISH
5   Bundle test : Adding link link_0 to the bundle
In this case, the incoming user logged in as foo and the PPP shell (pppsh) was initiated because the Callservices(4bnu) file defined this as the call service for port /dev/term/00m:
acu Any /dev/term/00m /bin/pppsh
If an outgoing link is often brought up unexpectedly,
use the PPP Manager to turn on
debugging in the bundle, and in the network protocol
(IPCP) definition that the bundle references:
ppptalk protocol ipcp_tag debug=1
ppptalk bundle bundle_tag debug=high
This level of debugging will log all IP packets and will perform decoding of TCP/IP headers. You will now be able to examine the type of IP traffic that is bringing up the link. Common causes are requests for DNS name service (to port/protocols: 53/tcp and 53/udp) and for SMTP mail transfers (to port/protocol: 25/tcp). If necessary, invoke the Packet Filter Manager and configure a bringup filter which will stop packets requesting these services from bringing up the link. Alternatively, it may sometimes be possible to reconfigure requests for these services so that they send packets to local machines rather than over the PPP interface.
Lines 6-59 show the negotiation of Link Control Protocol (LCP) parameters.
6   Link link_0 : LCP FSM Event Administrative Open
7   Link link_0 : LCP      Causes State INITIAL -> STARTING
8   Link link_0 : LCP Starting
9   Link link_0 : LCP FSM Event Up
10  Link link_0 : LCP      Causes State STARTING -> REQSENT
11  Link link_0 : LCP Constructing Configure Request
12  Link link_0 : LCP Request MRU 1500
13  Link link_0 : LCP 1500 is the default MRU, don't request it
14  Link link_0 : LCP Request ACCM 0xFFFFFFFF
15  Link link_0 : LCP 0xFFFFFFFF is the default ACCM, don't request it
16  Link link_0 : LCP Request Magic number 0xF4855AC4
17  Link link_0 : LCP Request PFC
18  Link link_0 : LCP Request ACFC
19  Link link_0 : LCP SKIP MRRU - Not configured for MP
20  Link link_0 : LCP Send Configure Request
21  Link link_0 : LCP Received Configure Ack
22  Link link_0 : LCP FSM Event Receive Configure Ack
23  Link link_0 : LCP      Causes State REQSENT -> ACKRCVD
24  Link link_0 : LCP Received Configure Request
25  Link link_0 : LCP Peer requests ACCM 0x00000000 (Nak with 0xFFFFFFFF)
26  Link link_0 : LCP Peer Magic number 0xEE5B1C4F (Ack)
27  Link link_0 : LCP Configure Request is unacceptable (Nak)
28  Link link_0 : LCP FSM Event Receive Configure Request (Not acceptable)
29  Link link_0 : LCP      Causes State ACKRCVD -> ACKRCVD
30  Link link_0 : LCP Send Configure Nak/Rej
31  Link link_0 : LCP Received Configure Request
32  Link link_0 : LCP Peer requests ACCM 0xFFFFFFFF (Ack)
33  Link link_0 : LCP Peer Magic number 0x8722C26A (Ack)
34  Link link_0 : LCP Peer requests PFC (Ack)
35  Link link_0 : LCP Peer requests ACFC (Ack)
36  Link link_0 : LCP Setting default MRU
37  Link link_0 : LCP Default AUTH (none)
38  Link link_0 : LCP Default MRRU (none)
39  Link link_0 : LCP Default ED (none)
40  Link link_0 : LCP Configure Request is acceptable (Ack)
41  Link link_0 : LCP FSM Event Receive Configure Request (Acceptable)
42  Link link_0 : LCP      Causes State ACKRCVD -> OPENED
43  Link link_0 : LCP Send Configure Ack
44  Link link_0 : LCP Up
45  Link link_0 : LCP Local options :
46  Link link_0 : LCP    Mru 1500
47  Link link_0 : LCP    Accm 0xffffffff
48  Link link_0 : LCP    ACFC Enabled
49  Link link_0 : LCP    PFC Enabled
50  Link link_0 : LCP    Magic Number 0xf4855ac4
51  Link link_0 : LCP    MultiLink Disabled
52  Link link_0 : LCP Peer options :
53  Link link_0 : LCP    Mru 1500
54  Link link_0 : LCP    Accm 0xffffffff
55  Link link_0 : LCP    ACFC Enabled
56  Link link_0 : LCP    PFC Enabled
57  Link link_0 : LCP    Magic Number 0x8722c26a
58  Link link_0 : LCP    MultiLink Disabled
59  Link link_0 : LCP Sending LCP Identification
On lines 24-30, the local host indicates to the peer that it wants to use an asynchronous control character map (ACCM) of
0xFFFFFFFF rather than the peer's suggested ACCM of
0x00000000. As hardware rather than
software flow control is being used with the modems at both ends
of the link, it would be possible to set the local LCP
configuration to request an all-zero map.
This would improve the performance of data transfer over the link.
On line 59, PPP sends an LCP identification packet to the remote host. A reply is not received until the IPCP phase of the negotiation on line 84 (see ``Negotiate IPCP and other parameters'').
Lines 45-58 summarize the negotiated LCP parameters. If the remote side requires that the local side authenticate itself using PAP or CHAP, you would also see one of the following lines in the peer options:
   LCP Require PAP Authentication
   LCP Require CHAP Authentication
If the local side requires that the remote side authenticate itself, one of these lines would appear in the local options.
If you see one on the following messages, the remote side has stated that it is not configured to authenticate itself using PAP or CHAP:
   LCP Peer Nak'ed request for PAP
   LCP Peer Nak'ed request for CHAP
The connection would then be closed, and one of the following messages would also be output:
   LCP We require PAP. Peer wouldn't authenticate using PAP.
   LCP We require CHAP. Peer wouldn't authenticate using CHAP.
See ``Perform PAP or CHAP authentication'' for more information about troubleshooting PAP and CHAP authentication once the local and remote sides have agreed on the method to be used.
If you see output such as the following when LCP sends its first configuration request to the remote side, it is likely that the remote side has not recognized that it should start a PPP session:
20  Link link_0 : LCP Send Configure Request
21  Link link_0 : LCP Restart Timer Expired (count 9)
22  Link link_0 : LCP FSM Event Timeout (Count non-zero)
23  Link link_0 : LCP      Causes State REQSENT -> REQSENT
24  Link link_0 : LCP Re-Send Configure Request
.
.
.
56  Link link_0 : LCP Re-Send Configure Request
57  Link link_0 : LCP Restart Timer Expired (count 0)
58  Link link_0 : LCP FSM Event Timeout (Count Zero)
59  Link link_0 : LCP      Causes State REQSENT -> STOPPED
60  Link link_0 : LCP Finished
If an outgoing link fails in this manner, it may be because it needs to issue an explicit command in its login chat script to start a PPP shell.
In this example, neither host chose to authenticate the other using PAP or CHAP. Only login authentication was performed when the connection was initiated.
60  Link link_0 : Phase was ESTABLISH, Phase Now AUTHENTICATE
61  Link link_0 : Authentication Initialized
62  Link link_0 : CHAP Started
63  Link link_0 : PAP Started
64  Link link_0 : Authentication Complete
65  Link link_0 : CHAP Terminated
66  Link link_0 : PAP Terminated
If the remote side refused to authenticate itself using the protocol (PAP or CHAP) requested by the local side, negotiation would fail and the connection would already have been dropped during the LCP phase. See ``Negotiate LCP parameters'' for more information.
If the remote side authenticates the local side using PAP, you should see messages such as the following if it succeeds:
   PAP Sending Request. Name 'foo', Secret 'clydenw'
   PAP Message 'Authentication successful'
   PAP Authentication with Peer Succeeded
If the local side authenticates the remote side using PAP, you should see messages such as the following if it succeeds:
   Authentication Initialised (timeout 60 seconds)
   PAP Started
   PAP Received Request
   PAP Name 'foo', Secret 'clydenw'
   PAP Peer succeeded PAP authentication (Send Ack)
If the remote side authenticates the local side using CHAP, you should see messages such as the following if it succeeds:
   CHAP Received Challenge
   CHAP Peer Name 'barsoom'
   CHAP Sending response. Local name 'foo'
   CHAP Received SUCCESS
   CHAP Message 'Authentication successful'
   CHAP Authentication with Peer Succeeded
If the local side authenticates the remote side using CHAP, you should see messages such as the following if it succeeds:
   Authentication Initialised (timeout 60 seconds)
   CHAP Started
   CHAP Send Challenge. Name 'barsoom'
   PAP Started
   ...
   CHAP Received Response
   CHAP Peer Name 'foo'
   CHAP Received Valid Response (Send Success)
   Authentication -  Peer name is 'foo'
   Authentication Complete
The following sections detail cases where authentication might fail:
Authentication will fail and you will see one of the following warnings if the authentication database is configured incorrectly:
   PAP WARNING No secret for the name peername
   CHAP WARNING No secret for the name peername
The protocol will be shown as PAP or CHAP depending on the type of authentication being performed. The possible causes of such warnings are:
If the local host failed to authenticate itself with the remote host using PAP, you would expect to see messages such as the following before the connection was closed:
   PAP Sending Request. Name 'foo', Secret 'clydenw'
   PAP Received Nak
   PAP Message 'Authentication failed'
   PAP Failed to authenticate with Peer
This may be because the local host gave the wrong password, or the remote host's authentication database did not contain a local PAP secret for the peer.
If the local host failed to authenticate the remote host (the peer) using PAP because the remote host gave the wrong password, you would expect to see messages such as the following before the connection was closed:
   PAP Received Request
   PAP Name 'foo', Secret 'clydenw'
   PAP Peer failed PAP authentication (Send Nak)
If the local host failed to authenticate itself with the remote host using CHAP, you would expect to see messages such as the following before the connection was closed:
   CHAP Received Challenge
   CHAP Peer Name 'barsoom.acme.com'
   CHAP Sending response. Local Name 'foo'
   CHAP Message 'Authentication failed'
   CHAP Failed to authenticate with Peer
This may be because the local host sent an incorrect response value calculated from an invalid secret, or the remote host's authentication database did not contain a local CHAP secret for the peer.
If the local host failed to authenticate the remote host (the peer) using CHAP because the remote host sent an incorrect response value calculated from an invalid secret, you would expect to see messages such as the following before the connection was closed:
   CHAP Send Challenge. Name 'barsoom.acme.com'
   CHAP Received Response
   CHAP Peer Name 'foo'
   CHAP Received invalid Response (Send Fail)
Lines 67-128 show the negotiation of Internet Protocol Control Protocol (IPCP) parameters.
67  Link link_0 : Phase was AUTHENTICATE, Phase Now NETWORK
68  Link link_0 : Entering NETWORK phase, notify kernel
69  Bundle Annex: Phase was DEAD, Phase Now NETWORK
70  Bundle Annex: Entering NETWORK phase, notify kernel
71  Bundle Annex: Start Protocol IPCP
72  Bundle Annex: IPCP FSM Event Administrative Open
73  Bundle Annex: IPCP      Causes State INITIAL -> STARTING
74  Bundle Annex: IPCP Starting
75  Bundle Annex: IPCP FSM Event Up
76  Bundle Annex: IPCP      Causes State STARTING -> REQSENT
77  Bundle Annex: IPCP Constructing Configure Request
78  Bundle Annex: IPCP Request Local Address 156.120.24.66
79  Bundle Annex: IPCP Request DNS Address 0.0.0.0
80  Bundle Annex: IPCP Request Secondary DNS Address 0.0.0.0
81  Bundle Annex: IPCP Send Configure Request
82  Bundle Annex: Got Statistics update
83  Bundle Annex: AUDIT outgoing Annex. Connected date
84  Link link_0 : LCP Received Code Reject
85  Link link_0 : LCP Code Reject is of Identification
86  Link link_0 : LCP FSM Event Receive Protocol/Code Reject (Acceptable)
87  Link link_0 : LCP      Causes State OPENED -> OPENED
88  Bundle Annex: IPCP Received Configure Reject
89  Bundle Annex: IPCP FSM Event Receive Configure Nak/Reject
90  Bundle Annex: IPCP      Causes State REQSENT -> REQSENT
91  Bundle Annex: IPCP Constructing Configure Request (after Reject)
92  Bundle Annex: IPCP Request Local Address 156.120.24.66
93  Bundle Annex: IPCP DNS Option was rejected
94  Bundle Annex: IPCP Secondary DNS Option was rejected
95  Bundle Annex: IPCP Send Configure Request
96  Bundle Annex: IPCP Received Configure Nak
97  Bundle Annex: IPCP FSM Event Receive Configure Nak/Reject
98  Bundle Annex: IPCP      Causes State REQSENT -> REQSENT
99  Bundle Annex: IPCP Constructing Configure Request (after Nak)
100 Bundle Annex: IPCP Local Address (Any) was Nak'ed with 156.120.135.2 - Allowing
101 Bundle Annex: IPCP Send Configure Request
102 Bundle Annex: IPCP Received Configure Ack
103 Bundle Annex: IPCP FSM Event Receive Configure Ack
104 Bundle Annex: IPCP      Causes State REQSENT -> ACKRCVD
105 Bundle Annex: IPCP Received Configure Request
106 Bundle Annex: IPCP Peer requests VJ Header Compression (Ack)
107 Bundle Annex: IPCP Peer requests Slot Compression (Ack)
108 Bundle Annex: IPCP Peer requests Max-Slot 16 (Ack)
109 Bundle Annex: IPCP Peer requests IP Address 156.120.1.57 (Ack)
110 Bundle Annex: IPCP Default DNS Advertisement (None)
111 Bundle Annex: IPCP Default DNS Advertisement (None)
112 Bundle Annex: IPCP Configure Request is acceptable (Ack)
113 Bundle Annex: IPCP FSM Event Receive Configure Request (Acceptable)
114 Bundle Annex: IPCP      Causes State ACKRCVD -> OPENED
115 Bundle Annex: IPCP Send Configure Ack
116 Bundle Annex: IPCP Up
117 Bundle Annex: IPCP Local address 156.120.135.2
118 Bundle Annex: IPCP Peer address 156.120.1.57
119 Bundle Annex: IPCP Local VJ Compression Disabled
120 Bundle Annex: IPCP Peer VJ Compression Enabled
121 Bundle Annex: IPCP     Max-Slot-Id 16, Slot Compression
122 Bundle Annex: IPCP Primary DNS Address (Not obtained)
123 Bundle Annex: IPCP Secondary DNS Address (Not obtained)
124 Bundle Annex: IPCP Configuring interface ppp0
125 Bundle Annex: IPCP Binding to network protocol 0x0021
126 Bundle Annex: IPCP Binding to network protocol 0x002d
127 Bundle Annex: IPCP Binding to network protocol 0x002f
128 Bundle Annex: IPCP Notify kernel protocol OPENED
On lines 77-97, IPCP negotiation could not establish the addresses of any advertized DNS servers, and LCP identification of the PPP version was rejected because the remote side's version of PPP did not recognize these requests.
On line 100, the remote side refused the request by the local end of the link for the IP address 156.120.24.66 and overrode it with the address 156.120.135.2.
Line 119 shows that the local host disabled VJ header compression whereas lines 120-122 shows that the remote host enabled it at its end. Enabling VJ header and slot compression at the local end would improve the performance of data transfer over the link. (Note that VJ header and slot compression should not be enabled for links over ISDN lines.)
Line 128 shows that the kernel has been notified that the PPP link has been established. The network interface corresponding to the link should now be visible using the ifconfig -a command.
Lines 129-159 show the link being brought down in orderly fashion after the command ppptalk detach Annex was issued.
129 Link link_0 : LCP FSM Event Administrative Close
130 Link link_0 : LCP      Causes State OPENED -> CLOSING
131 Link link_0 : LCP Send Terminate Request
132 Link link_0 : LCP Down
133 Link link_0 : CHAP Terminated
134 Link link_0 : PAP Terminated
135 Bundle Annex: IPCP FSM Event Administrative Close
136 Bundle Annex: IPCP      Causes State OPENED -> CLOSING
137 Bundle Annex: IPCP Send Terminate Request
138 Bundle Annex: IPCP Down
139 Bundle Annex: IPCP Notify kernel protocol CLOSED
140 Bundle Annex: IPCP Removing interface ppp0
141 Bundle Annex: IPCP FSM Event Down
142 Bundle Annex: IPCP      Causes State CLOSING -> INITIAL
143 Bundle Annex: Phase was NETWORK, Phase Now DEAD
144 Bundle Annex: Bundle Leaving NETWORK phase, notify kernel
145 Bundle Annex: Got Statistics update
146 Bundle Annex: AUDIT outgoing Annex. Total connection time t. Data n Kbytes
147 Link link_0 : LCP Received Terminate Ack
148 Link link_0 : LCP FSM Event Receive Terminate Ack
149 Link link_0 : LCP      Causes State CLOSING -> CLOSED
150 Link link_0 : LCP Finished
151 Link link_0 : LCP FSM Event Administrative Close
152 Link link_0 : LCP      Causes State CLOSED -> CLOSED
153 Link link_0 : Closing link to remote system.
154 Link link_0 : LCP FSM Event Administrative Close
155 Link link_0 : LCP      Causes State CLOSED -> CLOSED
156 Link link_0 : LCP FSM Event Down
157 Link link_0 : LCP      Causes State CLOSED -> INITIAL
158 Link link_0 : Phase was NETWORK, Phase Now DEAD
159 Link link_0 : LCP Finished finishing
Line 146 shows the total connection time and the number of bytes that were sent over the link.
The following message would indicate that the link has been closed because the physical connection, such as over a telephone line, has been lost:
Link link_0 : Physical Link has dropped, M_HANGUPThis may be caused by a fault with the physical connection itself, call waiting being enabled at either end of a telephone link which disrupts the line, or an impromptu shutdown of the remote system.
If you see a warning such as the following, the link has been dropped because the line was noisy:
LCP WARNING Link quality poor - Link DroppedThe link will be dropped if more than a certain proportion of echo samples fail to be returned correctly. Echo sampling can be turned off by setting the echo sample period to 0 for the LCP protocol.
If the PPP log file shows that the PPP link has been established, use the ifconfig(1Mtcp) command with the -a option to check if an interface (such as ppp0) for the link exists. If the interface does exist, it should appear similar to this:
   ppp0: flags=71<UP,POINTTOPOINT,WANTIOCTLS,RUNNING>
   	inet 156.120.135.2 --> 156.120.1.57 netmask ffffffff
   	perf. params: recv size: 4096; send size: 8192; full-size frames: 1
   	(alias) inet 156.120.135.2 netmask ffffffff     dest 156.120.1.57
Verify that the displayed flags indicated that it is marked UP and that the IP addresses for the ends of the link are what you expect. If an interface does not exist for the PPP link, the link may have been taken down because it was too noisy. Re-examine the PPP log file to discover where a problem may be occurring.
If an interface exists for the PPP link, try
to ping the other end of the link using the
command:
ping -ns remote_IP_address
remote_IP_address is the IP of the remote end of the link as displayed by either ppptalk status bundle Annex (under the heading ``IPCP State'') or ifconfig -a. If the ping succeeds, you may only need to check how routing is set up for the link. If you cannot ping the other side of the link, check that its interface still exists. If the link does not still exist, the link may have been taken down because it was too noisy. Re-examine the PPP log file to discover where a problem may be occurring.
See ``Troubleshooting TCP/IP'' for more information about troubleshooting problems with TCP/IP.
If an interface exists for the PPP link
but your system is not connected to a LAN or
another WAN,
you do not need to run a routing daemon such as
routed(1Mtcp)
to maintain the routing table, but you may need to configure
a default route to the outside world over the PPP interface.
List the contents of the routing table using the command
netstat -rn. If a default route does not exist
to the remote end of the PPP link, use the following command
to add one:
route add default remote_IP_address
remote_IP_address is the IP of the remote end of the link as displayed by the ifconfig -a command. Use the PPP Manager to configure this as the default route as described in ``Network protocol options''. Do not configure such a system to act as a router or as a proxy for ARP.
If your system is connected to a LAN or another WAN, and it is configured to act as a router to forward packets between the various networks, you should at least run routed on it. Use the PPP Manager to check whether it is configured as a router as described in ``Network protocol options''. If a routing daemon such as routed is running, you should not need to configure a default route over the PPP link. If other systems on a LAN need to be able to contact systems at the remote end of the link which have the same subnetwork address, configure proxy ARP.
See ``Troubleshooting IP routing'' for more information about troubleshooting routing problems.
The following notes describe how PPP should be configured on Microsoft Windows 95 and Windows 98 systems so that they can connect to a UnixWare 7 remote access server:
A UnixWare 7 remote access server can be configured to authenticate incoming calls based on one or more of the following methods:
; This script file demonstrates how ; to establish a PPP connection with ; a UnixWare 7 remote access serverproc main ; Allow server time to initialize delay 3
; Send Carriage Return transmit "^M"
; Wait for login prompt waitfor "login:"
; Send your user name transmit $USERID, raw transmit "^M"
; Wait for Password prompt waitfor "Password:"
; Send your password transmit $PASSWORD, raw transmit "^M" endproc
A UnixWare 7 remote access server can be configured to provide the TCP/IP parameters required by a Windows client:
3Com NetBuilder requires that multilink PPP Control Protocol packets are not encapsulated in multilink headers. If you are using SCO multilink PPP to interoperate with a site that uses 3Com NetBuilder, set nocp = true in the bundle definition.